Screenwriting With Outliner4D And Dramatica On A Mac
Keep track of your story's rich thematics with the powerful Outliner4d.
Developing a story with Dramatica is a fun and imaginative process. Starting with a basic idea, an afternoon spent with the program can result in a thematically rich and engaging narrative. The struggle comes in translating these elaborate and detailed story points into something someone can read...and enjoy.
Dramatica ships with a Scene Creation feature built into the program. Tucked away within the StoryGuide window, the Scene Creation section allows Authors to create scenes and attach relevant Story Points to them. You can title each scene, write a brief description, and along the bottom select the points that will come into play within this scene. A numerical counter in parenthesis at the end of each Story Point keeps track of how many times it has been referenced.

The general idea is to have each Story Point show up once per Act. Any more and you risk repeating yourself. Any less and you risk leaving a hole in your story. This isn't rocket science though; you can occasionally leave out a Story Point and not completely destroy your narrative. The important part is to be conscious of what is in there and what is not in there. That way you'll know how to fix it if someone feels that something is missing or that a scene comes off superfluous.
A Better Outliner
The Scene Creation feature is functional and it is nice that you can print out a Treatment with Structure Report that lists out the scenes and their attached Story Points--along with any specific Story Encoding you have written. Unfortunately the format of the report is fixed and even more unfortunately--Dramatica Story Expert is still not mobile friendly. In 2016. So any outlining work you want to do has to be done sitting at a desktop or with a giant laptop in front you.

Last year we spoke of writing everywhere and anywhere in a format that is transportable across all platforms. We still write that way and still find it to be the most productive approach. Yet that desire to bridge the gap between the work done within Dramatica and the work done writing has motivated us to find better and better ways of outlining. You can work forever and ever in Dramatica, adjusting storyforms, assigning character elements, and imagining greater and greater thematically rich scenes.
But eventually you have to write the thing.
The Evolution of Outlining
In the beginning we simply Exported to Screenwriter. Movie Magic Screenwriter is a fantastic WYSIWYG screenwriting program with a powerful Outlining feature along the left side. Importing a Dramatica DR5 file creates the scenes you specified in the Scene Creation window and attaches notes for each of the Story Points. It doesn't bring over the Story Encoding information.

Again, this is functional...but it's not very sexy. In addition, keeping track of multiple Throughlines becomes burdensome with a linear approach like this. You simply can't look at a wall-sized map through a peephole lens; eventually you lose the context.
In came Outliner4D (then called StoryView) and a structuralist's prayers were answered.

Outliner4D is so powerful that it would take several articles to explain all of its features. Outliner4D offers two major views: Outline and Timeline. The Outline is your typical top-down approach to outlining. You create nested lists of Acts, Sequences, and Scenes just like you would in any other program. The real magic happens when you switch to Timeline view.

In Timeline view you get a horizontally scrolling zoom-able view of your story's events. You can step back and look at the story as a whole or you can even zoom in and focus on a particular Scene or Sequence. The width or space each scene takes up is based on the Type and Amount of Duration you set for each item. Hamlet here was set to Number of Lines and you can see how Scene 1 consists of 190 lines whereas Scene 2 consists of 180 lines. Pull out and you might see that Scene 2 of Act 2 is 617 lines.

This is where Outliner4D shines.
Having a thematically rich story is one thing. Knowing the pacing and rhythm of that thematically rich story...that's quite another, and equally as important. With Outliner4D you get a visual representation of the timing of your story. Feel like your first Act is taking too long? Well now you can see how it compares to subsequent Acts and adjust the timing of each Scene accordingly.
Every screenwriter knows that one page of a screenplay equates to approximately one minute of screentime. Often they divide their story into three sections (Acts) with the first and last approximately half the length of the second. Entering the Duration of each Scene into Outliner4D would be a time-consuming and mundane process...which is why the creators of Outliner4D gave us the ability to write a screenplay within the program itself. Using the same engine found in Movie Magic Screenwriter, Outliner4D automatically calculates the length of each scene in minutes and adjusts its length on the timeline!
I once wrote an entire screenplay in Outliner4D (StoryView) and the effect it had on my writing was palpable. Seeing the rhythm of each Scene in context with the Sequences above and the Acts above that had a visceral impact on my story. I knew when my first Act was running too long and I knew how and where to stretch things out in the second Act to keep that rhythm consistent.
Nothing else comes close. But there's one more feature that pushes Outliner4D into another realm.
Tracking Story Points
While the visual representation of the rhythm of a story is a productive and thought-provoking tool, the ability to track Story Points across several scenes in a visual makes Outliner4D the outlining tool for Dramatica writers.
The Track Area that runs along the bottom of the Timeline view allows Authors to keep track of characters, story points, and events throughout the course of their story. You simply drag from the scene down to a Story Point and the connection is made. Instead of a simple numerical value appended to the end of an event, the Track Area offers a visual representation of the frequency of a Story Point. The effect is a confidence builder: want to make sure you're taking care of that Relationship Throughline that feels like it wanes somewhere in the middle of the 2nd Act? Track it and isolate those points where it drops off. Want to make sure you're not losing sight of the Main Character Throughline's Focus and Direction? Track those and make sure they happen enough times so that the Audience understands exactly what it is the Main Character is experiencing.

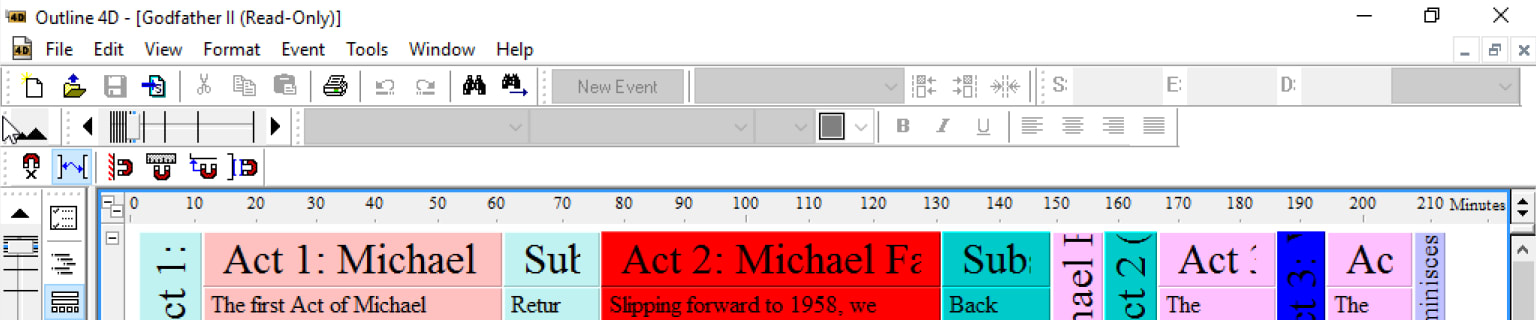
For instance, let's say you're writing Godfather II and want to see what Scenes deal with Michael and Kay Growing Apart. Simply click on the corresponding Track below and Outliner4D automatically hides those Scenes that have nothing to do with Michael and Kaye. You can see that they occupy a lot of time during the first half of the film but then ramp off during the second. If you felt you needed another scene of their relationship dissolving you might attack it somewhere in that 160-190 page area.[^godfather]
Outliner4D is made by the same people who made Movie Magic Screenwriter and the same people who made Dramatica--which means they work seamlessly together. You can import a DR5 from Dramatica and have those tracks show up in your story ready to go. You can also export from Outliner4D into Movie Magic Screenwriter to do any cleanup before rushing your latest draft off to your agent.
Outliner4D is an incredible tool for screenwriters and especially those well versed in the Dramatica theory of story. Only one problem...
...it doesn't exist on a Mac.
The Virtues of Windows
You probably noticed how ugly the screenshots of Outliner4D look compared to more recent modern Mac software. That is because Outliner4D is unfortunately still not available on the Mac platform. The only way to get this up and running is to install a virtual machine--essentially faking Outliner4D out by making it think you're running it on a Windows PC. While the process may look intimidating and challenging for the technically unaware, it really only consists of four easy steps:
- Install VirtualBox (your virtual machine)
- Install Windows (sad, but necessary proposition)
- Install Outliner 4D (almost there)
- Enjoy!
Ok, really it's only three steps but anyone who knows Dramatica knows everything comes in fours...so here we go:
Installing VirtualBox
There are several different options for installing a virtual machine, but we're going to focus on the free one. You still have to buy a Windows license and Outliner4D--both not at today's app pricing--so free wins. VirtualBox is a free download and is available here. Go for the latest edition by clicking the 'amd64' link next to VirtualBox 5.0 for OS X Hosts in the binaries section at the top. Once the image has downloaded, find it on your Mac, mount it and double-click the VirtualBox.pkf file to install it.
Note that you'll need at least 175MB of free space for VirtualBox in addition to the space required by Windows (up to 32GB). When finished, launch VirtualBox from your Applications folder.
Installing Windows on Your Mac
Purchase a Windows 10 license and download the ISO FILE. We purchased ours from NewEgg for around $100, chances are you'll find it for around the same price elsewhere. Once you have that (and especially the license key) you're ready to begin the process of installing Windows on your Mac:
- Click the New button on the VirtualBox toolbar and give your new virtual machine a name. Select the operating system you're installing (Windows 10 64-bit) and click Continue.
- Set memory size to 4GB (Outliner4D likes memory).
- Set virtual disk size to 32GB and click Continue. Go with the VDI (VirtualBox Disk Image) when asked.
- Leave the storage option set to Dynamically and click Continue
- Your virtual machine is ready to go--click Start to begin the Windows Installation process.
- Find your installation file (the one you downloaded in Step 1), select the ISO file and click Open.
- Install Windows...the rest is like starting a Windows PC for the first time--which isn't the most exciting thing and kind of depressing on a Mac, but hey...Outliner4D...
- You can go for Express Settings since chances are you want to get going right away.
Congratulations, you just installed your first virtual machine!
Installing Outliner4D
This part is easy compared to the last. Simply purchase Outliner4D, download it, and install it from within your virtual machine. Once you've done that you'll be able to begin working with Outliner4D. Have patience...it can take some time getting used to the PC methodology especially when you're used to working on a Mac. This includes Ctrl-C and Ctrl-V for copying and pasting when on a Mac it is Cmd-C and Cmd-V. Also, you tend to have to click a lot more in a Windows environment so be prepared for that as well.
Keeping Track of Your Thematically Rich Story
Working with Dramatica Story Expert is an education. You learn about Obstacle Character Throughlines and Relationship Story Throughlines, Story Drivers and Story Continuums, Protagonists and Antagonists, Guardians and Contagonists. What you don't usually learn is how to put it all together into a fullly functional narrative. Outliner4D provides a magnificent set of tools for those versed in Dramatica theory to develop and keep track of their story's most important points.
You want the work you have done in Dramatica to count--you don't want to forget it all the moment you start writing. Outliner4D helps bridge that gap between theory and practice and does so by taking a visually stimulating approach. You will have a better feel for the rhythm of your story and have a greater insight into what is and isn't working. Backed by Dramatica and Outliner4D, writer's block is but a myth.
[^godfather]: Or you could just leave it alone because it's a masterpiece.
Download the FREE e-book Never Trust a Hero
Don't miss out on the latest in narrative theory and storytelling with artificial intelligence. Subscribe to the Narrative First newsletter below and receive a link to download the 20-page e-book, Never Trust a Hero.